Central Screen Block
Channel Tabs support navigation across the whole Channel set, from 1 to 512 (or 1 to 1024 in the 1024 Channel version) and selecting the required page is as simple as clicking the folder tab.
The Central Screen Block is dedicated to Channel display and shows two Presets (A and B) that simulate a traditional, Theatrical 2 Preset Manual Console.
There are 32 faders on each tab and these control the output of a single DMX Channel. In common with the standard Windows 95 controls, the fader handle may be directly activated with the mouse or stepping may be performed clicking on the top and bottom arrows (1% steps).
Clicking on the space between handle and fader end results in steps of 5%, whilst using the "PgUp" and "PgDn" buttons will make larger steps. Using the "Home" key will give full intensity (or value) and the "End" key will give zero intensity (or value).
The Crossfade block slider may easily be used to switch between Presets A and B.
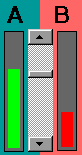
The output level of Presets A and B is determined by the Red and Green bars.
Operation of the Crossfade is detailed in the Crossfade Section
Each preset (A or B) provides a pull-down menu with a list of all Cues in the selected file.
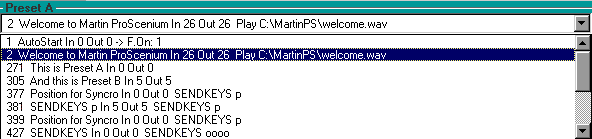
To make a Cue active or return it to the Preset, simply click on the Cue in the pull down menu.

The Record button assigns the contents of Preset (A or B) to a Cue.
Note: A Cue may be Recorded or Modified in Blind mode just by using the inactive Preset (normally Preset B)

TheĀClear button allows you to clear the contents of the related Preset.
See Cues for options on Cue Saving
Channel selection using the keyboard
A Channel may be selected using the keyboard by just pressing " * " or " C " followed by the Channel Number. To select a Channel using the keyboard and add it to the current selection, just key the Channel Number.
A Channel series may be selected by typing the first Channel Number, then " / " followed by the last Channel number of the series.
A Channel may be easily added to the current selection pressing the " + " key.
A Channel may be removed from the current selection by pressing " + " followed by the Channel Number and by the " - " key.
When you have selected your Channels press " . " to access them.
Selected Channels are displayed on the screen in a different colour.
Selecting a Channel situated on a different page will automatically reveal the page that the Channel is situated on. However, it is possible to go to the next Channel page by pressing " P " and to return to the previous page by pressing " O ".
The current selection may be cancelled at any time pressing the "Esc" key.
Channel level selection
a) With Keyboard
The intensity level to be assigned to the selected Channels is assigned pressing " . " followed by the desired percentage figure.
For zero level enter "0"
For levels 1 to 9 enter 0 plus one digit (e.g..09 for 9)
For levels 10 to 99, simply type in the two digit number
For level 100 (full) press "." Again
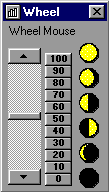
The level of selected Channels may also be increased smoothly using the Thumbwheel (this will appear when a Channel is selected) with the up-arrow and down-arrow keys (1% steps) or with the "PgUp" and "PgDn" keys (5% steps)
b) with Joystick
If the computer is equipped with a gameport and a Joystick or the FADJOY Plus optional control pad is installed, the selection wheel may be directly accessed EXCEPT WHEN THE SCANNER WINDOW IS SELECTED.
The type of control device must be specified in the Configuration Panel/Joystick folder, setting the device code to 4 for a simple Joystick and to 5 for FADJOY Plus.
The Channel Level Window  displays the level as a percentage (0 to 100% (FL)), or in hexadecimal (using full resolution) if the option is selected in the Configuration Panel. If the Channel is controlled by a group (groups higher than Channels) the level is shown in Purple colour, otherwise in Yellow.
Channel Numbers  If you move the Mouse cursor on top of the Channel Numbers, a pop-up text will be visible if fixtures are defined for the Channels, these are very often intelligent fixtures. If you click on the Channel with the Left Mouse Button, the Channel is automatically added/removed to the selection that is assigned to the Thumbwheel.
The Channel definition window (text, type of spot,...) may be shown at any time clicking the Channel with the Right Button.
On Preset B there is a "LAB/ SLI"  button beside the Record Button. This button allows you to toggle between labels and sliders, The labels will give a textual description of the Channel contents.
If you click on a Channel Number with Right Mouse Button, It will display a Channel Window allowing yout to alter Channel and Group setting, level display as a percentage or direct DMX hexadecimal representation.
If you wish to insert a specific fixture this may be done by Right Clicking on the selected Channel which will show the Options that are available, select the desired unit within the selected library and then save it to the Channel.
A Status Bar is shown at the bottom of the screen, providing the type of installed DMX interface hardware, the Number of Channels sent/received and the operating mode (Master/Slave).

The Grand Master fader is underneath the Crossfade Section. This Master is the general output level of the console. A Black-Out button is provided for immediate blanking. Clicking the button again the Master is selected back to Full with no modification of the pre-existing Channel values.
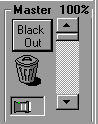
In the same frame is found the Trash Bin. Following the Drag & Drop technique, a Cue may be deleted just selecting it on the B preset, dragging it and dropping it in the trash bin. The same procedure may be used with all ProSceniumDMX objects: Groups (selected clicking on the group Numbers), Channels (selected clicking on the Channel Number) and Scanners (selected clicking on the " + " sign close to the scanners Combo Box).
Also in the same frame, there is an indicator giving the status of the DMX Adaptor or Card that is installed in the Computer, If there is a Red line across this box, it means that the Adaptor/Card is not functioning or not available
The Frame underneath this gives rapid access to the Chasers

A Chaser is a sequence of Cues that may be running in parallel to a crossfade, following a predefined time sequence.
Reading the Chaser Section will help you to understand how the Chaser mechanism works
Underneath this there are the Fixture Groups

A fixture group is a group of intelligent fixtures.
Select all the fixtures you want to group together in the Moving Light Selection Window this id done by checking the box beside the Fixture Details, Then click on one of the fixture group buttons using the Right Mouse Button. A Dialogue Box will appear asking you to confirm that you wish the selection to be stored to that particular button and then request a Group Name.
To recall a fixture group click on the button using the Left Mouse Button, This will open the Moving Light Window and give you control over your selected group. If other fixtures are selected, this will inverse the selection (select the group if it was unselected and deselect it if it was selected).
Double clicking on a button will result in an exclusive selection (by unselecting all and selecting only that fixture group).
Contents