Scanners/Moving Lights
Scanners (or moving lights) are becoming more and more popular. Every scanner provides access to the luminaire functions using the DMX-512 standard (in addition to other often provided proprietary communication links).
The number of channels used varies with the model and manufacturer. Martin PAL 1200 uses 26 channels per luminaire, assigned in the following order:
Channel Assignment
1 Lamp
2 Intensity
3 Shutter 1a
4 Shutter 1b
5 Shutter 2a
6 Shutter 2b
7 Shutter 3a
8 Shutter 3b
9 Shutter 4a
10 Shutter 4b
11 Shutter Rotation
12 Cyan
13 Magenta
14 Yellow
15 Colour Wheel
16 Gobos
17 Gobo Rotate
18 Focus
19 Zoom
20 Frost
21 Pan (MSB)
22 Pan (LSB)
23 Tilt (MSB)
24 Tilt (LSB)
25 Pan/Tilt Speed
26 Other Speed
ProSceniumDMX has built-in definitions for a large number of the most popular scanners and moving lights. If the definitions are have been defined the program is able to retrieve the channel data assignment from the library, and to format them in the Moving Light Window in a way totally transparent to the user.
The window is activated selecting the scanner to be activated inside the Scanner Drop Down Box

If the scanner of choice is not present in the scanner library, it may be added using the Spot Maintenance Utility you can find in the ProSceniumDMX program group, or manually see How Do I...Create my own Fixture Personality.
Assigning a Scanner
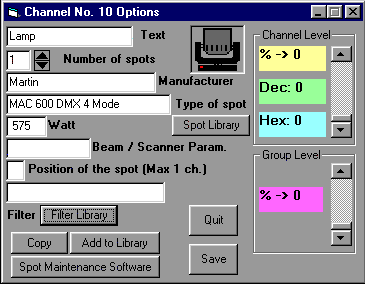
Click on the first scanner channel with right button, click on the "Spot Library" button and select the scanner and the corresponding DMX mode by clicking on the scanner Icon on the fixture list.
If the scanner of choice is not present in the list, follow the instructions in the section above.
When you have selected your fixture click on "Save"
If you have selected a moving light, you will have a series of Prompts for the following:
HTP/LTP Selection
If you wish to use moving lights and the effect generator, you must select "No"
Set Snap to final position for channel X
This is where you can assign "snap" channels, meaning that during a crossfade, designated "snap" channels (for example gobos), will go immediately to the final position.
You can change this setting at a later date by setting a curve 10 (linear no master) instead of 14 (snap no master) in the patch window.
Set Snap to final position for all channels
This is the same as above but attributed to all remaining channels occupied by the fixture.
Drag & Drop
This function is extremely handy to manage moving lights. Often when adding a moving light to a cue, all parameters must be edited in the previous cue, setting the intensity at zero.
If programming is carried out in this way, during the crossfade only the selected effects will happen, without undesired changes that could happen during the transition.
It is also possible to preset a series of positions for all scanners (e.g. table or drums etc.) by storing them in cues with very large numbers like 9900, 9901, etc.
During the final programming, Drag & Drop may be used to copy the pre-recorded scanners into the selected cues.
Select an idividual scanner in the Scanners Drop Down Box or if you wish to select all scanners at once, click on "Scanners" (first list entry). This action activates the Moving Light Selection Window.
This window allows to select all the luminaries that will be subject to the next action e.g. simultaneous multiple scanner copy using Drag & Drop.
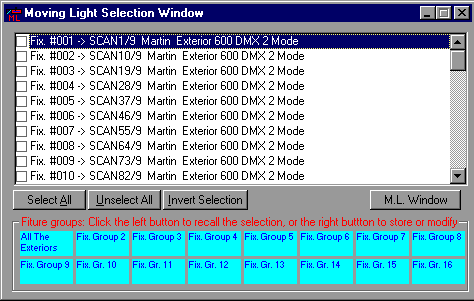
From this window you can also set fixture groups.
A fixture group is a group of intelligent fixtures.
Select all the fixtures you want to group together in the Moving Light Selection Window this id done by checking the box beside the Fixture Details, Then click on one of the fixture group buttons using the Right Mouse Button. A Dialogue Box will appear asking you to confirm that you wish the selection to be stored to that particular button and then request a Group Name.
To recall a fixture group click on the button using the Left Mouse Button, This will open the Moving Light Window and give you control over your selected group. If other fixtures are selected, this will inverse the selection (select the group if it was unselected and deselect it if it was selected).
Double clicking on a button will result in an exclusive selection (by unselecting all and selecting only that fixture group).
When you have selected your fixture(s) open up the Cue in Preset B where the selected scanner parameters should be copied.
Left Click with the Mouse on the "�+�" button at the left of the Scanners Drop Down Box (a scanner icon will be activated).
Keeping left button down, drop the scanner(s) on Preset B.
Following this action, you will have a series of Prompts for the following:
Do you want to put all the parameters of all selected scanners on Cue No. X
Do you want to copy anly Pan & Tilt Values
Do you want to put Intensity at zero
Reply with the desired options, after the final option, the parameters selected will be applied.
Automatic Scanner Recalibration
When touring a show, often the most tedious task is the recalibration of all scanners setup. With ProSceniumDMX this operation is extremely simplified:
First of all, include in your show two additional cues freely numbered (e.g. 901 and 902), assign them a number to immediately call them up later.
For example: 901 is "old scanner reset point" and 902 is "new scanner reset point". Then setup a scene where scanners are pointing to a uniquely defined and easily identified reference point on the stage (e.g. on the leftmost corner or on a fixed position object).
Try to focus the scanner beams as much as possible for greater accuracy. Store this scene on both 901 and 902 cues. Save this show on a file of choice.
After changing the stage, to recalibrate all cues, start from 902 playback and adjust all luminaires to point to the new position of the same object used as a former reference point on the earlier stage setup.
Then select Cue Editor (Cues -> Global Modification menu).
Select this button: and insert the interval of the cues where scanners should be recalibrated (normally all cues are included).
Select "Recalibrate Scanner Position in all selected cues" from the "List of the modifications you can operate in the selected cues" the number of the new reference cue (902). All scanners in all cues will be automatically adjust using the two reference points.
Only when the positional skew inherent to a global recalibration process is remarkably noticeable, a minor manual tuning will be required to recover the optimal pointing.
Moving Light window
Selecting a scanner in the Toolbar list/box, ProSceniumDMX opens a window that is used to allow one-time two-dimensional mirror control with Mouse or Joystick and to control colour with (Red, Green, Blue) colour mixing.
The title bar displays the name and type of luminaire and the circuits that it uses (e.g. for High End Cyberlight, channels 1 to 20)
For movement control, an absolute movement window is provided that simulates all moving range (entire Pan-Tilt span) of the luminaire.
Note that this window is ruled with a number/letter reference grid. Light movement is achieved just by moving across this window with mouse left button pressed.
A crossed-circle is used to simulate the luminaire spot.
Light movement can also be achieved using the up/down, left/right arrow keys.
When a set element is located, e.g. a table located at E6, the object will be directly pointed just moving and clicking mouse on E6 grid cell. (also if mode 2 is selected)
The window contains this toolbar:
ICON FUNCTION
 This button sets visualisation mode 1 (Full range). Moving your mouse over the grid will move your fixture around the whole range.
 This button sets visualisation mode 2 (Selected range). Moving your mouse over the grid will move your fixture around the range you have defined with buttons 5 and 6.
 This button sets visualisation mode 3 (Generic Zoom). Also if you aren't in the selected range, clicking this button you will see your fixture in the center of the grid. Moving your mouse over the grid will move your fixture smoothly around the centre.
 This button sets visualisation mode 4 (Arrows). Clicking on an arrow with left button will move slowly in the direction of the arrow. Clicking with right button will move faster.
 This button defines Top-Left corner of your range. First of all put your fixture in the position you want for Top-Left and then click this button to store the position.
 This button defines Bottom-Right corner of your range (width and height of the new range rectangle). First of all put your fixture in the position you want for Bottom-Right and then click this button to store the position.
 CMY Colour allows you to select the colour to assign to the luminaire. It may be chosen from the predefined colours, in continuous mode or personalised by the user. Clicking on "Color from Picture" allows you to pick colours directly from any bitmap (try it using the Van Gogh sample). In this window there is a button that allows you to add your personal CMY selection to the filter library. The new colours can be found at the bottom of the filter list.
 CMY Filter Colour from filter list. allows you to select a filter in the filter library. CMY values for the main filter manufacturer are collected in this database.
 Immediate button opens the immediate window.
 Copy selected parameters in one or more fixtures. Selecting this will open up a "How To" window and give step by step instructions.
 Moves to the next fixture.
 Moves to the previous fixture.
 Show the movement grid.
 Hide the movement grid.
 Show the Effect Generator Window
 Set the Fixture to Home Position, In Order to use this function you have to make a Cue in which you set the "Home" Position for all parameters of all fixtures and name it "Home". Following this, Clicking on this Icon will command the fixtures to return to these values.
 Direct Scanner selection�: goes immediately to selected fixture described above.
Allows fast scanner to scanner stepping.
 Zoom-In/Zoom-Out "-"/"+" button also allows to hide/show the absolute movement grid.
The Immediate Window for Scanner Personalities

This extremely powerful function allows you to store visually any scanner parameter in the personality window.
Activating any parameter of any scanner and dragging the parameter label on this window makes the source channel and value be stored and associated to a personalised icon and label set.
At any time the icon may be clicked and the channel/value will be played back.
Every value may be added and any variation of the library item may be generated and saved on disk.
Clicking on Edit allows also a direct editing of the file contents (critical operation recommended only to experienced users).
Clicking on "IconEd" allows to create your specific icon. Remember to click after on "Ref. Lib" to load the new icon in ProSceniumDMX memory.
The List Style button allows to have a Report or an Icon List Style.
Enabling the "All Scanner" check-box, means that all changes carried out on a scanner will also be applied to all scanners THAT HAVE THE SAME NAME FOR THE SELECTED PARAMETER.
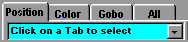
Position and Color and Gobo Preset in the Moving Light Window
There is an advanced function that allows you to use previously stored Presets in ProScenium directly from the Moving Light Window.
A preset can be stocked in any cue, and it is exactly like a normal cue, that you can define with a text, in which you can include as many fixtures you want.
To store a cue as a Preset, just make a new Cue, select a cue number, and, in the Recording Panel, just select the "Store this Cue as a Preset Cue" option.
You can decide now if you want to store a Position Preset (PP), a Color Preset (CP), a Gobo and Focus Preset (GP), or a All Parameters Preset (AP) The all parameter preset copy all the attributes of a fixture in the current scene.
The syntax to write in the name of the Cue is the following
PP1 Center Stage
CP1 Green
To recall this Preset from the Moving Light Window�:
First of all select the right tab Preset Tab
After that select a preset number to recall. If you wish to apply the preset to multiple fixtures, just check the "All Selected Scanners" box, select the fixtures you like, and click on the right preset in the preset combo box.
Likewise for the Position Preset, If the Tab appears to be selected already, click first on Position, and then on the Combo Box.
This is to speed up the loading of the window, and allows you to fill the Preset Combo Box only when needed.
A very fast way to manipulate preset is to load the Direct Access Software (Touch Screen Panel), and select Screen/Load Preset Screen for an instant access to Fixture Groups, and all the Position, Color, Gobo, All Presets.
Movement Macro
The ProScenium features a sophisticated engine for automatically generating pan/tilt movements.
To access the shape generator, click on the "Macro"  label in the Moving Light Window, or in the "Macro" icon in the MLW toolbar.
Use the various controls to define the shape, pan/tilt amplitude, speed, and other variables.
Note�: to work with macro you have to patch moving lights in mode LTP 5 and not in mode HTP. If fixtures are already patched you will have to patch them again, select NO at the first question as to whether to patch in HTP mode. You can also do this by using the menu Channel/Patch/Patch All intelligent fixtures in LTP 3 Mode
The major difference between the movement macros and normal movement programming (using the normal pan and tilt movement control) - is that the macro is a continuous dynamic movement contained within one scene.
The macro overlays the pan and tilt, so it is possible to move the macro-shape around by moving the pan and tilt as well.
Usually it is necessary to home or position pan and tilt when applying a macro - otherwise the macro will be applied to the fixture on top of the default pan and tilt positions (which is in the top left corner).
The macro control uses a drop down list to select the macro type, and slide bars to control parameter settings for the macro.
To stop the macro from executing, set the fade status of the macro type to off.
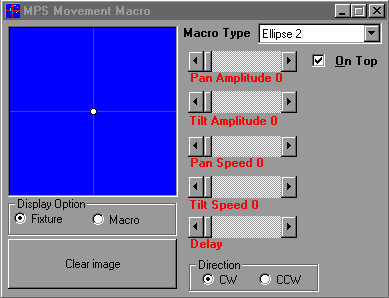
Macro display window.
The blue window on the left side of the control will display in real time the progression of the macro. The 3 buttons below the window works as follows :
Macro - This will show the macro executing without considering the actual pan/tilt position of the fixture.
Fixture - This will show the position of the fixture with the macro and current pan/tilt position combined.
Clear Image - This clears the window.
To get the full benefit from the macro engine, read through the more detailed explanation below.
Most of the controls will become familiar with use, but here is a brief explanation.
Macro Type
This list contains the possible macro types. There are 2 default basic macros.
Pan Amplitude
This parameter controls the amount of amplitude or "swing" applied to the pan parameter.
The higher the value, the further the pan will move in the macro.
Pan Speed
This parameter controls the speed at which the pan part of the macro executes. The higher the value, the faster the pan parameter will execute.
Note that pan and tilt speed controls may combine into one "speed" control for certain macros.
Tilt Amplitude
This parameter controls the amount of amplitude or "swing" applied to the tilt parameter.
The higher the value, the further the tilt will move in the macro.
Tilt Speed
This parameter controls the speed at which the tilt part of the macro executes. The higher the value, the faster the tilt parameter will execute.
Note that pan and tilt controls may combine into one "speed" control for certain macros.
Delay
This will 'delay' the fixtures position in the macro. Use this to assign individual delays to fixtures performing the same macro for a more varied look.
See below for a detailed explanation.
System Macros
The system macros are basically built up of sine/cosine relations - the simplest one is a circle, which is accessible from the system ellipse macro. The other system macros are made up of various other sine/cosine relations as well.
Let's take the circle as an example :
The engine works out the circle by applying an index into two arrays containing the sine and cosine values (ranging from -1 to +1) to form a circle.
The speed parameter controls how fast the index increments (or decrements if the direction is set to CCW) through the two arrays - a speed value of 1 increments the index by 1, a speed value of 2 increments the index by 2 (the macro will execute at twice the speed compared to speed 1) and so on.
The sine value is then multiplied with the tilt amplitude value and applied to the tilt value of the fixture, likewise the cosine value is multiplied with the pan amplitude and applied to the pan value of the fixture.
Finally these pan and tilt values are combined with the normal pan and tilt values obtained with the normal movement control.
The pan and tilt amplitude parameters has values ranging from 0 to 128, 0 represents no amplitude at all, 127 represents half a complete pan or tilt movement range. In order to get the maximum size of circle, home the fixture in pan and tilt, select the system ellipse macro.
Apply maximum pan and tilt amplitudes and a moderate speed value. If the fixture is positioned differently from the home position (neutral pan and tilt) it will be necessary to reduce the relevant amplitude, otherwise the fixture will be 'cut off' at the edges (easily seen in macro 'fixture' mode).
Macros that have both pan and tilt speed parameters use two individual indexes to look up the sine and cosine values. By using different values for the two speeds the indexes increments differently though the sine / cosine arrays - i.e. if one parameter has the double value of the other the result will be a figure-eight type of macro.
The delay parameter simply applies a constant value to the index(es).
The effect is pretty easy to see : select a single fixture, and create a maximum circle macro. Now drag the delay parameter around. The fixture still performs the same macro, but it just uses a different position (index value) in the macro.
Applying delays to one fixture doesn't make much of a difference, but when more fixtures are applied different delay values the result is a much more exciting look, particularly as the fixtures will have their individual position within the macro.
Contents